PLIF Surgery: Posterior Lumbar Interbody Fusion
Low back pain is an incredibly common problem. Although we recommend patients initially try non-operative pain management techniques, those with persistent pain may benefit from spinal surgery.
In this article, we discuss one of the most common techniques for fusion of the lumbar spine, a posterior lumbar interbody fusion (PLIF).

What is a PLIF surgery?
Posterior lumbar interbody fusion (PLIF) is a spinal surgery technique that can alleviate lower back pain and/or leg pain by removing a damaged spinal disc and fusing the pain-generating spinal segment. The spinal segment (meaning two adjacent vertebrae and the disc space in between them) is fused using an interbody spacer (cage), screws, and rods.
A PLIF surgery can be performed using a single, larger incision along the middle of a patient’s back or with multiple smaller, minimally invasive incisions (see below). Regardless of technique, a PLIF can remove pressure from a compressed nerve and eliminate painful, unwanted motion from a spinal segment.
Anatomy of the lumbar spine
The lumbar portion of the spine contains the five spinal vertebrae (L1 to L5) of the lower back.

Illustration of cross-section of spine, dorsal (back to front) and lateral (side) views, showing its vertebral sections.
What conditions does PLIF surgery treat?
For the right patient, PLIF can be used to treat a number of common conditions that cause low back pain and/or radiating leg pain. The patients that may benefit from a PLIF include those suffering from degenerative disc disease, sciatica, spinal instability (spondylolisthesis), spinal stenosis, recurrent disc herniation, and scoliosis. (Find a surgeon at HSS who performs lumbar fusion surgeries.)
How is PLIF surgery performed?
To perform a PLIF, the patient is placed prone (face down) under general anesthesia. An incision can then be made in the middle of the lower back at the effected level. The muscles are carefully moved aside to expose the effected vertebrae, and the lamina of that vertebrae is removed so that the spine and effected nerve root can be safely viewed and decompressed. (This is known as a lumbar laminectomy.) The nerves can then be retracted to expose the back of the intervertebral disc space. A portion of the affected intervertebral disc can then be removed, and the interbody cage can be placed in the empty disc space to promote fusion. Screws and rods can then be placed to maintain the decompression and augment fusion.
Video: Animation of a PLIF spine surgery
How is a minimally invasive PLIF surgery performed?
A minimally invasive PLIF can be performed in a number of ways, depending on surgeon preference and technique. In general, instead of a single, larger midline incision, smaller incisions will be made on either side of the spine. Through these small incisions, the areas of interest on the spine can be visualized and accessed with minimal muscle disruption. The laminectomy and decompression are performed through a small, tubular retractor. The screws and rods can then be placed with a surgical robot or visual navigation system to both improve screw accuracy and minimize the incision size.
Video: Animation of a minimally invasive PLIF spine surgery
What is the difference between a PLF and PLIF fusion?
The major difference between a posterolateral lumbar fusion (PLF) and a PLIF procedure is whether or not an interbody spacer is placed. In a PLF, the nerve roots are decompressed directly in the same way they are during a PLIF. In a PLF, the disc spaces are kept intact, and the vertebra are fused across the transverse processes purely with rods and screws. In a PLIF, the disc is removed and an interbody spacer is placed, allowing for fusion to be obtained both in the disc space and across the transverse processes.
When is a PLIF indicated versus an ALIF?
Both PLIF and anterior lumbar interbody fusion (ALIF) surgery involve placing an interbody spacer to promote fusion across lumbar vertebras. While a PLIF can be done entirely through a single posterior incision (meaning, from the back), an ALIF requires a separate incision and approach through the abdomen to access the front of the intervertebral disc space.
During an ALIF, the operation is normally performed in two stages. During the first stage of the operation, an incision is made along the abdomen. The abdominal muscles are split, and the abdominal contents are moved to the side, which allows visualization of the anterior spine. This portion of the operation is normally done with the help of a vascular surgeon. Once the spine has been exposed, the disc can be removed, and an interbody cage can be placed. The second stage of the procedure then involves flipping the patient into the prone (face down) position and conducting a PLF with screws and rods.
In general, a PLIF can be performed at any level of the lumbar spine (L1-S1), while an ALIF is best for patients with disease only at the lowest lumbar segments of the spine (L4-5 and L5-S1). PLIFs are also quicker operations given that they can be performed in a single stage through one incision along the back of the spine. ALIFs are also more difficult to perform on patients who are very obese or who have a history of extensive abdominal surgeries. Given that the ALIF provides access to the entire front of the spine, it can also offer maximum disc-height restoration and is a good choice for those undergoing fusion for deformities.
How long does PLIF surgery take?
The time required for a PLIF is highly variable depending on the surgeon, technique (open vs. minimally invasive), number of spinal levels being fused, and severity of disease. In general, when fusing one spinal segment (two vertebrae), a PLIF surgery takes between one to two hours. The patient will likely be in the operating room for two to three hours when accounting for the time necessary to begin anesthesia, position the patient, and wake them up after surgery.
A minimally invasive PLIF can usually performed in approximately the same amount of time but may take slightly longer when including the time necessary to set up and calibrate any minimally invasive navigation systems/robotics.1
How painful is PLIF surgery?
A PLIF surgery is performed under general anesthesia, so the patient will experience no pain during the procedure itself. The pain-blocking effects of anesthesia generally wear off in the hours after surgery and patients may experience some discomfort. This post-operative pain can be safely and effectively managed with oral prescription pain medication, however.
Given that a minimally invasive PLIF involves smaller incisions and less muscle injury, using this technique can reduce post-operative pain and the need for excessive prescription pain medication.
What is the recovery time for PLIF surgery?
Typically, for an uncomplicated one-level PLIF, patients stay one night in the hospital.2 For patients undergoing minimally invasive PLIF, many patients can actually go home on the same day of surgery.3
The total recovery time can range from 6 to 12 weeks. Most people require pain medication for the first one to two weeks after surgery. Most people can also return to work and begin driving within two weeks post-operatively. The range of recovery varies from patient to patient, however.
How long does back pain last after PLIF surgery?
Although the incisional pain often subsides within the first few days after surgery, one can expect lower back soreness for two to four weeks after surgery. Patients undergoing minimally invasive TLIF may have less soreness and earlier return to activities given it requires less muscle dissection.
How soon can you walk after PLIF surgery?
Typically, patients start walking the same day of their PLIF surgery. Patients are encouraged to walk as soon as they feel ready to after surgery.
Do you need physical therapy after PLIF surgery?
Physical therapy can be beneficial in reducing pain and inflammation after surgery. It can also strengthen your back muscles and assist in a graded recovery post-operatively. Your surgeon will speak with you about when it is appropriate to start physical therapy after any specific surgery.
What risks or complications can occur with PLIF surgery?
As with any spinal surgery, the risks of a PLIF can include bleeding, infection, damage to the fluid filled membrane surrounding the nerves (durotomy), injury to the nerves, and a need for re-operation at the same, or adjacent, spinal levels. The risk for bleeding or infection during a PLIF is less than 1%. The risk of durotomy is also low at around 5% – if a durotomy occurs, it is usually repaired with sutures and does not affect the post-operative course.4 Re-operation at the same, or an adjacent, spinal level is needed in approximately 10% to 15% of cases. This is because any spinal fusion removes motion at one spinal segment and therefore puts additional stress on the surrounding, mobile segments. This can accelerate the natural rate of degeneration in the lumbar spine.
How successful is PLIF surgery?
When performed on the right patient, PLIF surgery can be very successful in relieving back and leg pain, improving physical function, and decreasing overall disability.5 Research conducted at HSS has shown that 85% to 90% of our patients who have undergone PLIF feel better after surgery and are satisfied with the outcomes.6
Why choose HSS for lumbar decompression and fusion surgery?
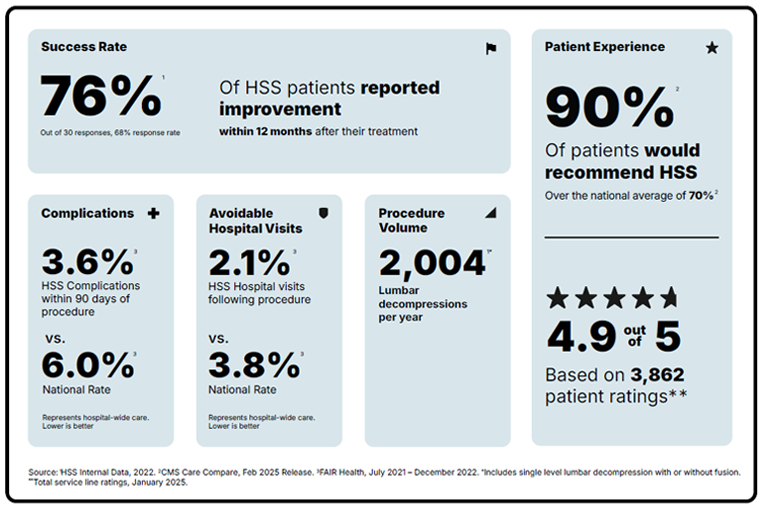
Lumbar spinal decompression with fusion is a surgery focused on reducing pain and getting you back to the activities you love. But not all hospitals achieve the same results. Some are more reliable than others. With the help of the HSS Hospital Reliability Scorecard, you can make sure you're asking the critical questions to find the hospital that's right for you. Understanding these data points will help you make the best decision for your care: See hospital reliability data
Authors

References
- Asada T, Simon CZ, Lu AZ, Adida S, Dupont M, Parel PM, Zhang J, Bhargava S, Morse KW, Dowdell JE, Iyer S, Qureshi SA. Robot-navigated pedicle screw insertion can reduce intraoperative blood loss and length of hospital stay: analysis of 1,633 patients utilizing propensity score matching. Spine J. 2024 Jan;24(1):118-124. doi: 10.1016/j.spinee.2023.09.004. Epub 2023 Sep 12. PMID: 37704046.
- Oezel L, Okano I, Hughes AP, Sarin M, Shue J, Sama AA, Cammisa FP, Girardi FP, Soffin EM. Longitudinal Trends of Patient Demographics and Morbidity of Different Approaches in Lumbar Interbody Fusion: An Analysis Using the American College of Surgeons National Surgical Quality Improvement Program Database. World Neurosurg. 2022 Aug;164:e183-e193. doi: 10.1016/j.wneu.2022.04.067. Epub 2022 Apr 25. PMID: 35472646.
- Soffin EM, Wetmore DS, Beckman JD, Sheha ED, Vaishnav AS, Albert TJ, Gang CH, Qureshi SA. Opioid-free anesthesia within an enhanced recovery after surgery pathway for minimally invasive lumbar spine surgery: a retrospective matched cohort study. Neurosurg Focus. 2019 Apr 1;46(4):E8. doi: 10.3171/2019.1.FOCUS18645. PMID: 30933925.
- Buck JS, Yoon ST. The Incidence of Durotomy and its Clinical and Economic Impact in Primary, Short-segment Lumbar Fusion: An Analysis of 17,232 Cases. Spine (Phila Pa 1976). 2015 Sep 15;40(18):1444-50. doi: 10.1097/BRS.0000000000001025. PMID: 26426713.
- Morse KW, Alluri RK, Vaishnav AS, Urakawa H, Mok JK, Virk SS, Sheha ED, Qureshi SA. Do preoperative clinical and radiographic characteristics impact patient outcomes following one-level minimally invasive transforaminal lumbar interbody fusion based upon presenting symptoms? Spine J. 2022 Apr;22(4):570-577. doi: 10.1016/j.spinee.2021.10.013. Epub 2021 Oct 23. PMID: 34699995; PMCID: PMC9178522.